 Sie haben sich zum Kauf von Gabionen entschieden - und jetzt?
Zum Aufstellen von Gabionen müssen Sie nicht zwingend einen Fachmann beauftragen. Mit ein wenig handwerklichem Geschick und den richtigen „Zutaten“ können Sie die Gabionen selber bauen und diese als Sichtschutz, Lärmschutz, Gabionenzaun oder dekoratives Element im Garten nutzen.
Damit Sie beim Gabionen setzen keine bösen Überraschungen erleben und keine wichtigen Aufbauelemente vergessen, haben wir für Sie alle wichtigen Aspekte zum Thema „Gabionen selber bauen“ in einer Gabionen Aufbauanleitung zusammengestellt.
 Sichtschutz, Lärmschutzwand oder Begrenzungen mit einem Gabionenzaun bieten große Spielräume bei der Gartengestaltung. Selbst ein Hochbeet aus Gabionen oder Sitzmöglichkeiten für die Terrasse lassen sich mit den Steinkörben umsetzen.
Die Variabilität in Breite, Höhe und Optik erfordert jedoch zugleich eine sorgfältige Planung. Immerhin sollen die Steinkörbe im Garten stabil stehen, keine Lücken zeigen und eine harmonische Einheit bilden.
1. Welchen Zweck sollen die Gabionen erfüllen? Sichtschutz, Begrenzung, Zaun, Hangsicherung, Lärmschutz usw.
Davon abhängig ist die Entscheidung für:
2. Maße für Breite, Tiefe und Höhe der Gabionen
3. Maschenweite der Gabionen: abhängig von der Befüllung (Steingröße)
4. Drahtdicke: je höher die Mauer wird, desto stärker sollte der Draht sein
5. Gabionen Untergrund: Ist ein Fundament erforderlich?
Ist eine Verankerung erforderlich?
Welcher Untergrund gewählt wird, ist in erster Linie von der Größe der Gabionen und dem Gewicht abhängig. Aber auch die Neigung der Gabionen bzw. die Lage am Hang hat Auswirkungen auf die Frage: Gabionen mit oder ohne Fundament aufstellen?
6. Auswahl des Füllmaterials: Neben Steinen ist z.B. auch eine Befüllung mit Glas möglich.
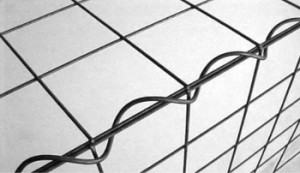
7. Welche Verbindungselemente sollen genutzt werden? Randdrahtgitter mit Spiralen bzw. C-Ringen oder Ösengitter mit Steckstab?
8. Evtl. Klärung der örtlichen Bauvorschriften, denn beim Sichtschutz und Abgrenzung zur Straße hin kann es spezielle Vorgaben zum Gabionenverbau geben, die sich je nach Bauamt unterscheiden.
Hilfreich bei der Planung zum Gabionen selber bauen ist ein Gabionen Konfigurator bzw. ein Zaungabionen Konfigurator. Damit können Sie die Anzahl der Drahtgitter bzw. Körbe, die Länge, die Maschenweite und weitere wichtige Merkmale auswählen. Ein weiterer Vorteil des Konfigurators: Sie erhalten gleich einen Preis für die Gabionen Materialkosten.
Die Materialauswahl ist teilweise abhängig von der Gabionengröße, dem Schließsystem und der Aufbau-Art. Davon ist wiederum die Wahl der Werkzeuge abhängig. Die folgende Liste ist daher als vollständige Auflistung aller Geräte und Materialien zu verstehen, die beim Gabionen selber bauen zum Einsatz kommen können. Wählen Sie daher das zu Ihrem Projekt passende Zubehör aus. Weitere Hinweise dazu gibt es unter den Punkten „Untergrund für Gabionen“.
Material:
Arbeitsgeräte:
Ausrüstung:
Welche Steine Sie in die Gabionenkörbe füllen, bleibt zum größten Teil Ihrem Geschmack, Ihren Ideen bzw. Ihrem Wunsch überlassen. Häufig werden aus optischen Gründen Natursteine verwendet, aber auch Schotter ist möglich. Alternativ können Sie die Gabionen auch mit großen Glasstücken befüllen.
Wichtig ist jedoch, dass die Steine folgende Anforderungen an die Qualität erfüllen:
Es gibt nicht d e n Gabionen Untergrund. Wenn Sie sich dafür entscheiden, Gabionen selber zu bauen, so müssen Sie die Untergrundbefestigung von der Mauerart (Größe und Umfang), der Untergrundbeschaffenheit und der Lage der Gabionen im Garten abhängig machen. Wichtig ist auch, dass der Boden gleichmäßig gerade ist, damit die Gabione einen festen Halt hat. Bei einem wenig durchlässigen Boden sollten Sie zusätzlich eine Entwässerung hinzufügen.
Sollten Sie sich unsicher sein, welcher Untergrund welche Anforderungen mit sich bringt, kontaktieren Sie besser einen Fachmann für Gabionen. Die Steinkörbe als Gabionenzaun, Hochbeet oder Sichtschutz erfüllen die Ansprüche an Langlebigkeit und Sicherheit nur, wenn ihr Gabionen Untergrund an die jeweiligen Anforderungen angepasst wurde.
In den meisten Fällen reicht ein „Frostschutzfundament“ vollkommen aus. Sie heben hierzu einen Fundamentgraben aus, bauen Frostschutzmaterial (lt. Montageanleitung) ein, verdichten dieses lagenweise mittels Rüttelplatte, ziehen die Oberfläche ab und setzen darauf Ihre Gabione.
In folgenden Situationen ist ein Gabionen Fundament erforderlich:
Ist der Boden im Garten relativ weich, nass und im Allgemeinen wenig tragfähig, sollten Sie sich ebenfalls für ein Gabionen Beton Fundament entscheiden. Die einfachste Lösung ist ein Streifenfundament, dessen Größe der zukünftigen Gabionenauflagefläche entspricht - ca. 10 cm breiter als der Gabionenkorb!
Ganz wichtig beim Gabionen setzen mit Fundament: Damit der Beton richtig aushärtet, müssen die Wetterbedingungen passen. Sowohl beim Beton-Gießen als auch einige Tage danach sollte es weitgehend trocken und frostfrei sein.
Verankerungen sind vor allem dann empfehlenswert, wenn es sich um eine dünne, hohe Gabionenwand handelt. Als Befestigungen werden in der Regel verzinkte Stahlpfosten (rund oder rechteckig) verwendet.
Am sichersten ist die Befestigung, wenn Sie lt. Montageanleitung die verzinkten Stahlrohre einbetonieren, bzw. die Fußplatten mit Schwerlastdübel am Fundament verschrauben.
Gabionen Fundament aus Beton – Schritt für Schritt Aufbauanleitung
Ein Gabionen Fundament zu setzen, bedarf keines speziellen Fachwissens, das ist auch für Laien recht leicht umsetzbar – noch leichter mit unserer Schritt für Schritt Anleitung zum Gabionen einbetonieren.
Die Fundamentgröße richtet sich nach den Abmessungen der Gabionen. Stecken Sie daher als Erstes die Fläche, die betoniert werden soll, mit kleinen Holzpfählen in den Fundamentecken ab. Eine Verbindung der Pfähle mit Bindfaden erleichtert die gerade Ausrichtung.
Angaben zur Fundamenttiefe entnehmen Sie der Montageanleitung, so gehen Sie sicher, dass das Fundament den Belastungen der Gabionen standhält und keine Beschädigungen durch Frost erleidet. Zum Ausheben benötigen Sie je nach Bodenbeschaffenheit eine Hacke, einen Spaten oder eine Schaufel.
In welchem Umfang die Verschalung mit Holzbrettern angebracht werden muss, ist von der Bodenbeschaffenheit abhängig. Bei einem festen, wenig bröckelnden Boden reicht die Verschalung am oberen Rand. Da die Verschalungsobergrenze zugleich die Oberkante des Fundaments ist, müssen Sie die Verschalung mit einer Wasserwaage ausrichten.
Für eine lange Gabionenmauer im Garten werden weder ein Eimer noch eine Schubkarre zum Betonmischen reichen. Dafür können Sie in Baumärkten einen Betonmischer ausleihen. Folgende Ausgangsmaterialien benötigen Sie für den Beton:
Das Mischverhältnis ist auf den Zementsäcken genau angegeben. Bei Normalbeton besteht die Mischung aus 4 Teilen Kies, 1 Teil Zement und Wasser in der Menge von ca. der Hälfte des Zements. Geben Sie das Wasser immer nur nach und nach dazu und achten Sie darauf, dass der Beton nicht zu flüssig wird. Fertig gemischten Beton erkennen Sie daran, dass er glänzt, zähflüssig ist und alle Elemente gleichmäßig vermischt sind.
Verarbeiten Sie den Beton für das Gabionen Fundament so schnell wie möglich, da die Masse schnell aushärtet und dann nur noch schlecht verwendbar ist.
Am leichtesten lassen sich große Mengen an Beton mit einer Schubkarre transportieren und in das ausgehobene Loch schütten. Gießen Sie aber nur langsam, damit sich keine größeren Luftblasen bilden. Beim Einsatz von Bewehrungsmatten füllen Sie zunächst nur die Hälfte des Lochs, setzen die Matte ein und füllen den Graben danach komplett auf.
Zaungabionen müssen mit Pfosten befestigt werden, die ihrerseits in einem Betonfundament verankert sein müssen. Hier fertigen Sie ein Punktfundament an – im Abstand von maximal 150 cm. Füllen Sie die Hälfte des Lochs mit Beton, setzen Sie den Pfosten ein, füllen Sie den restlichen Beton nach und richten Sie den Pfosten mit einer Wasserwaage aus.
Der Ablauf der Gabionen Montage ist von der Wahl des Ausgangsmaterials abhängig, d.h. davon, ob Sie Gabionen Einzelkörbe wählen oder Einzelgitter. Einzelgitter bieten den Vorteil, dass beim Aufbau Material gespart werden kann, nämlich in Form des monolithischen Aufbaus. Hier besteht die Gabionenwand nicht aus mehreren Einzelteilen, sondern einem Block, bei dem aufeinandertreffende Körbe nur durch eine Gitterwand getrennt werden. Allerdings ist das natürlich nur sinnvoll, wenn es sich um den Bau relativ umfangreicher Gabionen handelt.
Ein weiterer Vorteil der monolithischen Bauweise ist das Fehlen klaffender Fugen bei Rundungen bzw. schräg verlaufenden Gabionenmauern. Ein Fugenversatz erübrigt sich, sodass ein gleichmäßiges, optisch ansprechendes Steinbild entsteht.
In der folgenden Gabionen Aufbauanleitung werden beide Varianten – Wahl von Einzelgitter und Gabionenkörben – berücksichtigt. Sollten Sie sich beim Gabionen selber bauen für die Körbe entscheiden, beginnen die relevanten Montagepunkte für Sie an Punkt 3.
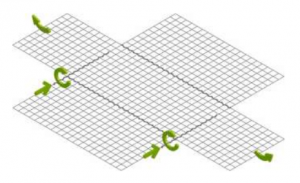
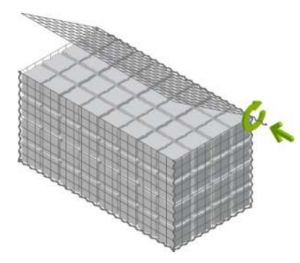
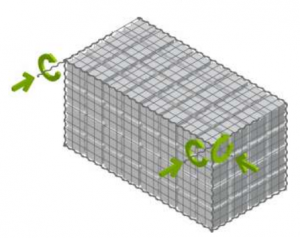
Verbinden Sie den Gitterboden an allen vier Seiten mit den jeweils passenden Drahtgittern – mit einer C-Ring-Verbindung oder einer Spiralverbindung. Die C-Ringe bieten eine schwächere Verbindung als die Spiralen, sind für kleinere Gabionen, wie sie oft im Garten- und Landschaftsbau eingesetzt werden, aber völlig ausreichend.
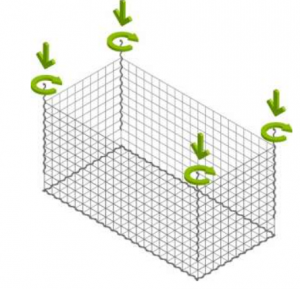 Stellen Sie die Seitenwände senkrecht und verbinden Sie sie mit dem eben aufgeführten Verbindungsmaterialien.

Stellen Sie die Körbe an der gewünschten Stelle auf der Terrasse, im Garten oder an der Grundstücksgrenze auf und verbinden Sie die nebeneinander stehenden Körbe mit C-Ringen oder Spiralen.
Distanzhalter sorgen dafür, dass die Gabionenkörbe ihre gerade Form behalten. Gehen Sie dabei wie folgt vor: Setzen Sie bei einer Korbhöhe von 100 cm die Halter im Abstand von 30 cm von unten und oben ein.


Nutzen Sie hierfür Kanthölzer mit den Maßen mit einem Durchmesser von mindestens 3 x 5 cm und befestigen Sie diese längs auf beiden Seiten in Höhe der Distanzhalter. Sie verhindern das Ausbauchen der Gitter während des Befüllens.
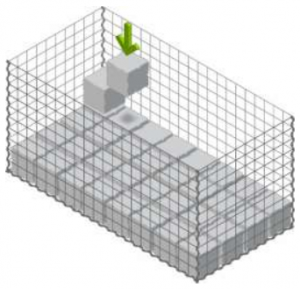
Füllen Sie die Körbe mit dem für die Maschengröße geeigneten Material. Achten Sie dabei darauf, die Hohlräume zwischen den Steinen möglichst gering zu halten. Während man kleine Steine noch recht gut durch Schütten einfüllen kann, führt an größeren Steinen kein Weg an der Einzelbefüllung per Hand (Handschichtung) vorbei.
 Ist die Gabione bis zum oberen Rand befüllt, setzen Sie den Drahtdeckel auf und befestigen sie ihn mit Spiralen oder C-Ringen.
Wenn weitere Lagen auf die erste Gabionenschicht folgen sollen, schütten Sie am besten in die unterste direkt unter dem Deckel eine Ausgleichsschicht mit kleinerem Steinmaterial. So verformt sich die unter Lage nicht so leicht, wenn weiteres Gewicht hinzugefügt wird.
Gabionen selber zu bauen erfordert zwar etwas Ausdauer, ist aber mit dem richtigen Werkzeug, dem richtigen Material und einer guten Vorbereitung kein Problem. Damit die Gabionenwand im Garten am Ende so aussieht, wie sie aussehen soll und lange hält, ist aber eine exakte Planung unerlässlich – das betrifft vor allem das Gabionen Fundament.
Ebenfalls nicht zu unterschätzen ist die Wahl der Steine (passend zur Maschengröße und witterungsresistente Qualität) sowie das richtige Einschichten.
Unser Profi-Tipp: Denken Sie daran, dass die Last über das Füllmaterial abgetragen wird, nicht über die Gitter! Füllen Sie daher immer mit so wenig Hohlräumen wie möglich und richten Sie die Steine, wenn nötig, nach, vor allem, wenn Sie die Steine einschütten. Denn auch dann muss meisten per Hand nachverdichtet werden.
Diese Webseite verwendet Cookies
Um unsere Webseite für Sie optimal zu gestalten und fortlaufend verbessern zu können, verwenden wir Cookies. Um die Funktionen unserer Webseite vollumfänglich Nutzen zu können, willigen Sie bitte in deren Nutzung ein.
Notwendige Cookies helfen dabei, eine Webseite nutzbar zu machen, indem sie Grundfunktionen wie Seitennavigation und Zugriff auf sichere Bereiche der Webseite ermöglichen. Die Webseite kann ohne diese Cookies nicht richtig funktionieren.
| Name | Anbieter | Zweck | Ablauf |
|---|---|---|---|
| cookieinfo | HS Gabionenshop | Speichert die Benutzereinstellungen zu den Cookies. | 90 Tage |
| cms130-session | HS Gabionenshop | Eindeutige ID, die die Sitzung des Benutzers identifiziert. | Session |
Präferenz-Cookies ermöglichen einer Webseite sich an Informationen zu erinnern, die die Art beeinflussen, wie sich eine Webseite verhält oder aussieht, wie z. B. Ihre bevorzugte Sprache oder die Region in der Sie sich befinden.
| Name | Anbieter | Zweck | Ablauf |
|---|---|---|---|
| hsgabionenshop-customertype | HS Gabionenshop | Speichert den Kundentyp (Privatkunde / Geschäftskunde) für die entsprechende Preisdarstellung der Artikel | 30 Tage |
| cms130-language | HS Gabionenshop | Speichert die vom Benutzer ausgewählte Sprachversion einer Webseite. | 90 Tage |
Statistik-Cookies helfen Webseiten-Besitzern zu verstehen, wie Besucher mit Webseiten interagieren, indem Informationen anonym gesammelt und gemeldet werden.
| Name | Anbieter | Zweck | Ablauf |
|---|---|---|---|
| _ga | Google Analytics | Registriert eine eindeutige ID, die verwendet wird, um statistische Daten dazu, wie der Besucher die Website nutzt, zu generieren. | 2 Jahre |
| _ga_* | Google Analytics | Enthält eine zufallsgenerierte User-ID. Anhand dieser ID kann Google Analytics wiederkehrende User auf dieser Website wiedererkennen und die Daten von früheren Besuchen zusammenführen. | 2 Jahre |
| _gat | Wird von Google Analytics verwendet, um die Anforderungsrate einzuschränken | 1 Tag | |
| _gat_* | Google Analytics / GTM | Wird von Google Analytics verwendet, um die Anforderungsrate einzuschränken | 2 Jahre |
| _gac_* | Google Analytics / Ads | Wird von Google Analytics verwendet, um die Anforderungsrate einzuschränken | 2 Jahre |
| _gid | Registriert eine eindeutige ID, die verwendet wird, um statistische Daten dazu, wie der Besucher die Website nutzt, zu generieren. | 1 Tag |
Marketing-Cookies werden verwendet, um Besuchern auf Webseiten zu folgen. Die Absicht ist, Anzeigen zu zeigen, die relevant und ansprechend für den einzelnen Benutzer sind und daher wertvoller für Publisher und werbetreibende Drittparteien sind.
| Name | Anbieter | Zweck | Ablauf |
|---|---|---|---|
| IDE | Verwendet von Google DoubleClick, um die Handlungen des Benutzers auf der Webseite nach der Anzeige oder dem Klicken auf eine der Anzeigen des Anbieters zu registrieren und zu melden, mit dem Zweck der Messung der Wirksamkeit einer Werbung und der Anzeige zielgerichteter Werbung für den Benutzer. | 1 Jahr | |
| AMP_TOKEN | Google Analytics | Nutzer-ID für AMP Tracking | 1 Jahr |
| FPID | Serverseitige Nutzer-ID | 2 Jahre | |
| test_cookie | DoubleClick (Google) | Verwendet, um zu überprüfen, ob der Browser des Benutzers Cookies unterstützt. | 15 Minuten |
| ads/ga-audiences | Used by Google AdWords to re-engage visitors that are likely to convert to customers based on the visitor's online behaviour across websites. | Session | |
| NID | Nutzerpräferenzen und Werbung, Registriert eine eindeutige ID, die das Gerät eines wiederkehrenden Benutzers identifiziert. Die ID wird für gezielte Werbung genutzt. | 1 Jahr | |
| _gcl_au | Google Ads | Conversion-Tracking und Anzeigenmessung | 90 Tage |
| _gcl_aw | Google Ads | Zuordnung von Conversions zu Ads-Klicks | 90 Tage |
| _gcl_dc | Google Ads | Conversion-Tracking (Display & Video 360) | 90 Tage |
| IDE | DoubleClick (Google) | Personalisierte Werbung / Remarketing | 1 Jahr |
| ANID | Google Ads | Werbe-Tracking | 1 Jahr |
| Maps* | Eingebettete Karten / Google Maps | ||
| VISITOR_INFO1_LIVE | YouTube | Versucht, die Benutzerbandbreite auf Seiten mit integrierten YouTube-Videos zu schätzen. | 179 Tage |
| YSC | YouTube | Registriert eine eindeutige ID, um Statistiken der Videos von YouTube, die der Benutzer gesehen hat, zu behalten. | Session |
| yt-remote-device-id | YouTube | Speichert die Benutzereinstellungen beim Abruf eines auf anderen Webseiten integrierten Youtube-Videos | Persistent |
| yt-remote-session-app | YouTube | Speichert die Benutzereinstellungen beim Abruf eines auf anderen Webseiten integrierten Youtube-Videos | Session |
| yt-remote-session-name | YouTube | Speichert die Benutzereinstellungen beim Abruf eines auf anderen Webseiten integrierten Youtube-Videos | Session |
Cookies sind kleine Textdateien, die von Webseiten verwendet werden, um die Benutzererfahrung effizienter zu gestalten.
Laut Gesetz können wir Cookies auf Ihrem Gerät speichern, wenn diese für den Betrieb dieser Seite unbedingt notwendig sind. Für alle anderen Cookie-Typen benötigen wir Ihre Erlaubnis.
Diese Seite verwendet unterschiedliche Cookie-Typen. Einige Cookies werden von Drittparteien platziert, die auf unseren Seiten erscheinen.
Sie können Ihre Einwilligung jederzeit von der Cookie-Erklärung auf unserer Website ändern oder widerrufen.
Erfahren Sie in unserer Datenschutzrichtlinie mehr darüber, wer wir sind, wie Sie uns kontaktieren können und wie wir personenbezogene Daten verarbeiten.
Bitte geben Sie Ihre Einwilligungs-ID und das Datum an, wenn Sie uns bezüglich Ihrer Einwilligung kontaktieren.